Leave Your Message

How to Choose LED Strip Lights for Outdoor Use

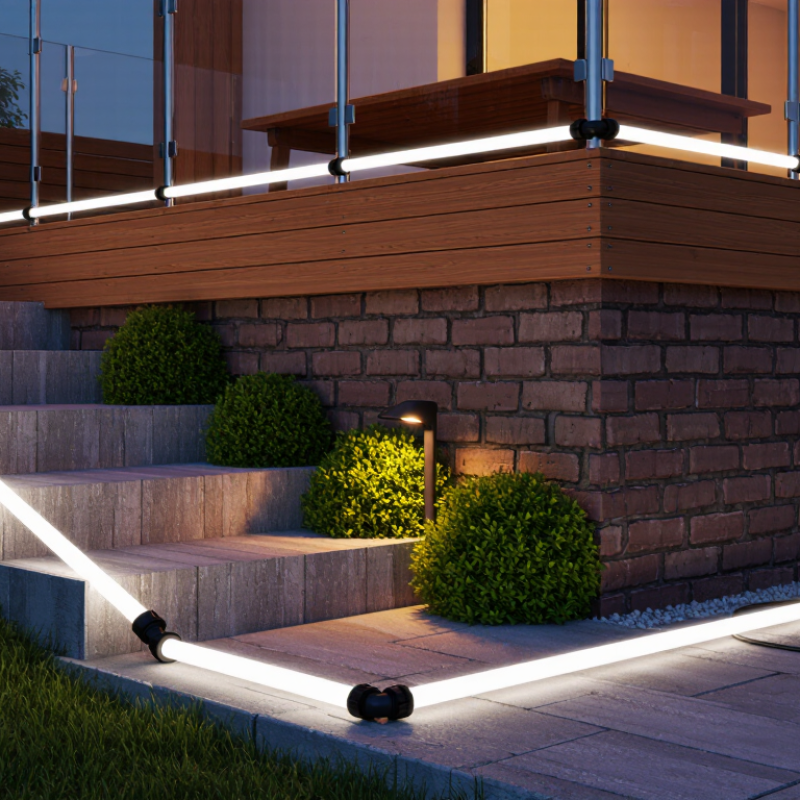
Outdoor lighting can transform a dark patio, garden path, or balcony into a more useful and inviting space. But choosing Led Strip Lights Outdoor involves more than picking a color or length. Rain, dust, temperature changes, and prolonged sun exposure can affect how well a strip performs. A product that looks suitable in a photo may not handle a damp corner or a hot afternoon.

Start by considering where the lights will go. Measure the route, note nearby power sources, and check whether the strip will sit under a roof or face direct weather. Look for clear information about water resistance, outdoor-rated connectors, and the power supply. These details matter. A protected strip can still fail if its connections are left exposed. Also check brightness, color temperature, and dimming options against the task: soft warm light may suit a seating area, while steps need clear, even illumination.

Installation deserves equal attention. Clean, dry surfaces help adhesive backing hold, though extra clips may be needed on rough walls or beneath a deck. Leave room for corners and avoid bending the strip sharply. Follow the manufacturer’s instructions, especially when cutting or joining sections. Small details count. I’ve found that planning the cable path before installation can prevent an awkward finish, but every site is different. Even careful planning has limits. Compare the product’s specifications with your actual conditions, and treat vague claims as a reason to investigate further. A thoughtful choice should balance durability, appearance, safety, and ease of maintenance—not just the lowest price.
How to Choose LED Strip Lights for Outdoor Use

Assess the Outdoor Location and Environmental Conditions

Choosing outdoor LED strip lights begins with studying the exact location, not the product box. A covered balcony faces different risks than a garden path. Measure sunlight, rain direction, standing water, and night temperatures. A wall under an eave may stay dry, while its lower edge collects splashback. I once underestimated that detail, and moisture reached a connector after heavy rain. Small gaps matter.

Tips: Match protection to exposure. Use weather-resistant strips and sealed connectors in damp areas. For fully exposed spaces, select a suitable IP rating verified by technical documentation. Higher protection helps against water, but it does not excuse poor installation.

Keep connections above drainage lines, add a drip loop, and protect cables from sharp masonry. Salt air near the coast, chlorine near pools, and strong ultraviolet light can age materials quickly. Leave room for heat to escape. A strip inside a sealed, sun-heated channel may fail sooner.

Check seasonal temperature changes before choosing adhesive. Dusty brick, rough concrete, and peeling paint often need mechanical clips. That is less elegant, but more dependable. Confirm the power supply suits the strip length and local electrical requirements. A qualified electrician should handle mains connections. Inspect the installation after the first storm, then again after several weeks. Outdoor conditions are rarely constant.
Choose an Appropriate Weatherproofing and IP Rating

Outdoor LED strip lights face rain, dust, condensation, and sharp temperature changes. The IP rating is your first practical filter. Under IEC 60529, the first digit measures solid-particle protection. The second measures water resistance. IP65 blocks dust and resists water jets. IP67 adds temporary immersion protection, commonly up to one metre for 30 minutes. IP68 covers deeper or continuous immersion, but its exact limits come from the manufacturer. More protection is not automatically better. A sealed strip can still fail through an unprotected connector.

Match the rating to the installation, not the product photograph. A covered balcony may need IP65, while a garden edge exposed to puddles deserves IP67 or higher. Never place the power supply where water can collect. Use matching waterproof connectors, sealed end caps, and a drip loop that directs water downward. Leave room for thermal expansion. Outdoor heat can shorten component life, even when the strip is technically waterproof. The U.S. Department of Energy reports that LEDs use at least 75% less energy. They can last up to 25 times longer than incandescent lighting. That efficiency matters outdoors, where replacement often means ladders, tools, and weather delays. Still, I would not treat an IP number as a guarantee. Installation quality is the weak link.

Tips: Check every component’s rating, not only the strip. Test the full run before sealing connections. Inspect joints after the first heavy rain. If condensation appears inside a connector, stop and revise the seal rather than hoping it dries. That small mistake is easy to repeat.

Compare Light Output, Color, and Electrical Requirements

How to Choose LED Strip Lights for Outdoor Use

Outdoor LED strips should be compared by useful light output, not appearance alone. Check lumens per meter and power consumption together. A bright strip may create harsh glare under a patio roof. A lower-output strip can work better along steps or garden borders. Measure the installation area before choosing brightness.

I once underestimated reflected light from pale paving. The result felt much brighter at night.

Color affects comfort and visibility. Warm white, around 2700K to 3000K, suits seating areas and timber surfaces. Neutral white, near 4000K, shows pathway details more clearly. Cool white can look sharp, but sometimes feels unpleasant outdoors. For colored lighting, confirm whether the controller supports smooth dimming and stable color changes.

Color rendering also matters. A high-CRI white strip usually makes plants, food, and outdoor furniture look more natural. Specifications can be incomplete, so request test data when possible.

Electrical requirements deserve careful checking.

Match the strip voltage with the power supply exactly. Calculate total wattage from strip length and watts per meter. Add roughly 20 percent capacity for cooler, more reliable operation. Long runs may suffer voltage drop, causing dim or uneven sections. Feed power from both ends or divide the run when recommended by the manufacturer.

Use outdoor-rated connectors, sealed cable entries, and a suitable IP rating for the exposure. IP65 may resist water jets, but submerged areas need stronger protection. I still recheck every connection after rain; waterproof claims do not excuse careless installation.

Select Durable Strip Materials and Compatible Mounting Options

Outdoor LED strip lights face rain, dust, sunlight, and repeated temperature changes. Material choice matters more than brightness.

The International Energy Agency reports that lighting uses about 15% of global electricity. Efficient LEDs reduce consumption, but poor outdoor protection can shorten service life. Choose strips with UV-stabilized silicone or sealed flexible housings. PVC may cost less, yet it can harden or discolor under strong sunlight. Check the complete assembly’s IP rating under IEC 60529. IP65 resists water jets, while IP67 also supports temporary immersion. IP ratings are not the whole story.

That sounds obvious.

Mount the strip inside an outdoor-rated aluminum channel when possible. Aluminum helps spread heat, and heat remains a common LED failure factor. The U.S. Department of Energy identifies thermal management as a key solid-state lighting research priority. Use stainless-steel clips, sealed screws, or mechanical brackets on masonry and wood. Do not depend on adhesive backing alone. Dust, frost, and textured surfaces can loosen it within months. Neutral-cure outdoor sealant can protect cable entries without attacking sensitive materials. Leave drainage paths open.

I have seen installations fail because the strip was waterproof, but the connector was not. Seal every joint with a compatible enclosure or heat-shrink system. DOE estimates that LEDs use at least 75% less energy than incandescent lighting, but efficiency cannot repair poor mounting. A channel that traps water still needs reconsideration.

How to Choose LED Strip Lights for Outdoor Use

Compare the ingress protection (IP) codes when selecting strips for outdoor exposure. The chart shows the code digits—not a performance score.

All four ratings have a solid-protection digit of 6, meaning dust-tight. The water-protection digit describes different test conditions: IP65 and IP66 cover water jets, IP67 covers temporary immersion, and IP68 covers immersion under conditions specified for the product. Choose a rating suited to the installation, and use compatible outdoor-rated mounting channels and corrosion-resistant hardware.

Check Power, Controls, and Safety Before Installation

Outdoor LED strips need a power supply matched to their voltage and total wattage. Multiply the strip’s watts per metre by the installed length, then check the supply’s rated output and the maker’s recommended load limit. Long runs can lose brightness near the far end, so consider shorter sections or power feeds at both ends. Heat matters. The U.S. Department of Energy’s LED Lighting overview says LEDs use at least 75% less energy than incandescent lighting and can last up to 25 times longer. That comparison is not a guarantee for outdoor strips; heat, moisture, and poor connections can shorten their life.

Check that the strip, connectors, and power supply are rated for the actual exposure, such as rain, spray, or areas that may collect water. An IP rating describes protection against dust and water, but it does not make every product suitable for every location. Match controllers and dimmers to the strip’s voltage and control type, and confirm their outdoor rating too. Before installation, disconnect power and keep joints inside suitable enclosures. Use a protected outdoor outlet where required by local electrical rules, and ask a qualified electrician if wiring is uncertain. I would recheck every connector after positioning the strip; even a small gap can let water in.

How to Choose LED Strip Lights for Outdoor Use: Check Power, Controls, and Safety Before Installation

Selection Check What to Look For Practical Guidance Before Installation
Outdoor protection rating Choose a strip and connectors with an IP rating suited to the actual exposure. IP65 products are generally protected against dust and water jets. IP67 products are tested for temporary immersion under specified conditions; this does not make them suitable for permanent submersion. Check the rating for the complete assembly, including end caps, splices, and connectors. Follow the manufacturer’s installation instructions.
Supply voltage Confirm the strip’s required constant-voltage supply, commonly 12 V or 24 V DC. For the same power, a 24 V strip draws less current than a 12 V strip and may be more suitable for longer runs, subject to the product’s limits. Use a compatible power supply. Never connect a low-voltage DC strip directly to household mains voltage.
Power-supply capacity Check the strip’s rated power per metre and calculate the total load. Calculation: watts per metre × installed metres = strip load. For example, 8 W/m × 5 m = 40 W. A supply rated around 48 W or higher provides a 20% capacity margin, if permitted by the product instructions. Include the load from every strip section and controller. Do not exceed the power supply’s continuous output rating.
Run length and voltage drop Compare the planned run with the manufacturer’s maximum continuous length. Long runs can become dimmer or change colour toward the far end because of voltage drop. Higher-voltage systems, shorter sections, or appropriately designed power feeds can help. Use the specified wire gauge and feed locations. Do not assume that one long strip can be powered safely from a single end.
Controls and dimming Match the controller to the strip type, voltage, current, and control method. Single-colour, tunable-white, RGB, and RGBW strips require different channel arrangements. A dimmer must be compatible with the strip and power supply. Check the controller’s maximum current per channel and total output. Place non-weatherproof controllers in a suitable protected enclosure.
Weather exposure and location Consider rain, direct sun, temperature changes, irrigation, and possible standing water. Use products rated for the expected outdoor temperature range. UV-resistant materials can be important in locations with prolonged direct sunlight. Mount the strip where water can drain. Avoid locations where it may be crushed, submerged, or exposed to chemicals unless the product is rated for those conditions.
Electrical protection Use a suitable low-voltage power supply and appropriate circuit protection. Outdoor mains-powered equipment may require a ground-fault circuit interrupter (GFCI) or locally required equivalent. Keep mains connections protected from weather and follow local electrical codes. Have a qualified electrician handle mains wiring when required.
Connections and installation Use outdoor-rated connectors, cable, and sealing methods compatible with the strip. Cut only at the marked cut points. A cut strip may lose its original water protection unless the cut end is resealed as instructed. Test the full system before final mounting. Follow the specified bend radius and mounting method; do not sharply fold or staple the strip.

Safety note: Product ratings and installation requirements vary. Verify the strip, power supply, controller, connectors, and local electrical-code requirements before installation.